One of the best monitoring software packages available for system administrators is Nagios. It’s free, open source, has a large community of developers and users for support and can be relied upon to provide outstanding monitoring for mission critical devices.
As part of our infrastructure management service, SPK uses Nagios to give us quick and helpful information at our various clients to resolve issues before the end user does. It can be used for basic connectivity checks or more complex checks like automated web page logins or remote server checks for available disk space. Nagios is native to the Unix environment and as such, it is very easy to setup monitoring on remote Unix-based hosts. Typically, your Nagios server will do basic checks right out of the box for your servers, such as connectivity checks. But to handle more in depth monitoring, you would need to install a NRPE (Nagios Remote Plugin Execution) client on the servers that you want to monitor. Nagios provides a native Unix-based client, but does not provide a Windows-based client. That’s where NSClient comes in. It’s a Windows-native NRPE service that can run on a wide variety of Windows-based servers and even workstations.
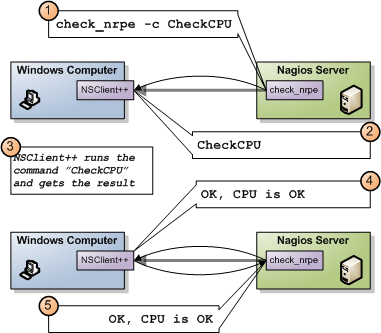
Here’s a diagram of how it works:
 As you can see, the Nagios servers in the above diagram send a request to the Windows computers, asking them to execute a command called CheckCPU. The NSClient service running on the Windows computers runs the command, checks the CPU and returns the result to the Nagios server. The Nagios server parses the OK message and reports everything is fine. If something was wrong, it would report back a CRITICAL error and Nagios would send an alert if one has been defined.
So, how do we set this up? For this example, I am going to assume that you have a functioning Nagios monitoring server setup and functional.
1. First, we need to download the NSClient program for Windows. You can obtain this at http://www.nsclient.org
2. Next, after downloading the client, install it on your Windows computer. I recommend not modifying any of the options in the installation wizard as we will be customizing the installation a bit later. Make sure NOT to start the client after installing. There is an option in the wizard to start the service after installation, we don’t want to do that just yet.
3. After the program is installed, navigate to the NSClient++ directory which should be in your C:\Program Files directory.
4. There is a file named NSC.ini in there. This is the main configuration file for NSClient. Open this in your favorite text editor.
5. In the first section [Modules] uncomment the following:
Filelogger.dll
CheckSystem.dll
CheckDisk.dll
NRPEListener.dll
CheckEventLog.dll
CheckHelpers.dll
CheckExternalScripts.dll
6. Further down in the NSC.ini file, in the [Settings] section make sure these are set:
use_file=1
allowed_hosts=<set to the IP address of your Nagios server(s)>
7. Now in the [NRPE] section we need to enable the following:
allow_arguments=1
This will allow us to send commands to the Windows client that require arguments. Alternatively, you can create aliases for commands and leave this option unset, but I find it easier for testing to leave it enabled.
8. In the [External Script] section, there is an option for allow_arguments=1, make sure that is enabled as well.
9. And that’s it for a basic, working configuration. Now click on your Start Menu, Programs, NSClient++, and then click on Start NSClient++, this will start the client and specifically the NRPE listener.
10. Now, from your Nagios server, head over to the libexec directory for Nagios, typically in the /usr/local/nagios/libexec directory and type the following command:
check_nrpe -H <IP or name of Windows computer>
You should get a response like this:
I (0.3.3.19 2008-07-02) seem to be doing fine...
If it’s not working, make sure you check the log file on the Windows computer in the main NSClient++ directory under Program Files. This should give you an indication of what’s wrong. Also make sure there’s no firewall rules blocking incoming connections on the Windows machine.
11. If you got a response, you’ve now got a working NRPE client for Nagios on Windows! Congrats!
There’s a lot more configuration and commands that can be added, but I will be discussing those in my next post. Stay tuned!
Have any thoughts or comments regarding Windows monitoring with Nagios or NSClient tips and tricks? Feel free to share in the comments section below!
Bradley Tinder
Systems Integrator, SPK and Associates


